Labels

Wednesday, December 4, 2019

Pengalaman Kerja

Pengalaman kerja? Aku hanya berpengalaman bekerja di dua tempat. Pertama, sewaktu aku menunggu keputusan SPM. Pertama kali bekerja, aku meminta kerja kosong sebagai service crew di SDS bakery iaitu sebuah bakery dan kafe yang terletak agak berhampiran dengan rumah aku. Dengan langsung tiada pengalaman bekerja, aku akui memang agak sukar bagi aku menyesuaikan diri bekerja disana. Tambahan pula, bekerja dalam bidang yang melibatkan customer service memerlukan kesabaran yang tinggi. Setakat ditengking tu perkara biasa. Bekerja disini melatih aku untuk lebih berani berhadapan dengan pelbagai jenis orang. Pengalaman bekerja disini menyedarkan aku bahawa aku bukan hanya perlu melayan kerenah pelanggan, tetapi juga rakan sekerja yang berbagai ragam. Luckily for me, I had two amazing friends sewaktu bekerja disana. In fact, we still keep in touch and hang out everytime aku pulang ke JB untuk bercuti.


Pengalam bekerja aku yang kedua pula ialah sebagai retail assistant merangkap cashier di sebuah kedai menjual bahan-bahan membuat kek. Suasana kerja disini berbeza dengan tempat kerja aku sebelumnya yang sentiasa sibuk. Aku bukan seorang yang gemar membuat kek, jadi agak sukar untuk aku menjawab soalan-soalan yang diajukan oleh customer. Nasib baik my workmates semua sangat membantu dan banyak pengetahuan baru aku peroleh daripada mereka.


Monday, December 2, 2019

Microsoft Access 2013 : Basic Things You Need to Know

Create a Database :

1) Right after you start Microsoft Access 2013, this is how your screen will look like :

Click on the Blank desktop database.

2) Choose a name and default location. Click create.

Create a Table 

1) Select CREATE > Table from the Ribbon toolbar

2) Rename the ID field to a new name you want for your table. To do this, Right-click on the ID column and select Rename Field. Enter the new table name.

3) On the next field, click on Click to Add (unless Access has already opened the menu for you) and select Short Text:
At this point, Access will conveniently highlight/select the field name (currently Field1). Enter the new field name.

4) If you wanto to enter date or time, click on Date & Time data type and name the field. For example, let's say you name the field as DateCreated :


Switch to Design View :

1) Click on the View icon at the top left.

2)At this point, Access will ask you to name and save the table you just created. Type your table name and click OK:


3) You are now looking at your Customers table in Design view. Click on the DateCreated field, then in the bottom pane, enter =Now() in the Default Value field. Also click in the Format field and select General Date from the contextual menu:


We have just set a default value for the DateCreated field. This means that, whenever a new record is entered, this field will automatically be populated with the current date and time. We have also specified a format for all dates that are stored in this field.

4) You can easily switch back to Datasheet View by clickin on the View icon at the top left ( just like when you switch to design view). Select the Datasheet View. This is how it looks like :


Penulisan Memo


Apa itu memo? Memo merupakan sejenis surat yang digunakan untuk perhubungan rasmi antara pekerja, unit, jabatan atau bahagian di dalam organisasi yang sama.

Jenis-jenis memo :

  • Memo Dalaman - Memo yang digunakan untuk urusan antara individu, bahagian dan cawangan dalam sesuatu organisasi. Oleh sebab memo berbentuk edaran dalaman, maka perkara seperti alamat surat menyurat, pangkat dan jawatan serta rujukan kehormat selalunya diringkaskan.
  • Memo Luaran - Terdapat 3 jenis iaitu ; 
                                       a) Memorandum Persefahaman - dikenali sebagai MoU
                                       b) Memorandum Bantahan -  membantah arahan atau ketetapan yang                                                                                                    dikeluarkan oleh sesuatu pihak.
                                       c) Memorandum Cadangan -  memohon atau mencadangkan sesuatu perkara                                                                                         untuk dipertimbangkan atau dilaksanakan oleh                                                                                         pihak-pihak tertentu.

Ciri-ciri memo :

  • Maklumat yang disampaikan hendaklah jelas.
  • Hendaklah lengkap dengan nombor rujukan, tarikh, perkara dan tandatangan.
  • Tidak terikat dengan sesuatu bentuk.
  • Tidak terlalu formal, ringkas dan mempunyai catatan salinan kepada.
Fungsi Memo :
  • Menjimatkan masa sekiranya maklumat perlu disebarkan segera tanpa ada mesyuarat.
  • Berperanan sebagai catatan atau peringatan tentang hasil sesuatu perbincangan dan sebagainya.
  • Memastikan pengaliran maklumat bertulis yang berterusan antara pihak dalam organisasi sama ada antara pekerja dengan pekerja atau majikan dengan pekerja.
Bentuk Memo :


-Memo mempunyai bahagian-bahagian seperti kepala, badan, dan kaki memo :
  • Kepala - Nama, alamat dan lambang atau logo syarikat/organisasi.
  • Badan - Isi memo / perkara yang ingin disampaikan.
  • Kaki - Tanda tangan dan nama pembuat memo.
Contoh Memo :


Untuk maklumat lebih lanjut, sila klik video ini.


Sunday, December 1, 2019

Resepi Kerabu Maggi

Hello semua!! Harini aku nak kongsikan resepi kerabu maggi yang sangat simple dan mudah dibuat.

Bahan :
-Maggi Serda 
-Sos ikan
-Jus limau
-Tomato
-Kubis
-Sosej (optional)
-Isi Ketam (optional)

Cara Memasak :
1) Panaskan air dan rebus maggi.
2) Toskan air dan gaulkan maggi bersama serbuk perencah. (Jika tidak mahu maggi terlalu pedas atau masin, hanya masukkan 3/4 serbuk sahaja).
3) Masukkan sedikit sahaja jus limau dan sos ikan.
4) Masukkan tomato yang telah dipotong dadu, kubis yang dihiris, sosej dan isi ketam yang telah direbus. Anda juga boleh menambah bahan anda sendiri seperti udang dan sotong untuk menambahkan perisa.
5) Gaul rata kesemua bahan-bahan.

Maggi Serda Thai

Kerabu Maggi


Sunday, November 24, 2019

Basic skills (Formatting Pages) in Microsoft Words

Hello everyone, today i would like to share some basic knowledge about Microsoft Words. Here are some topics that I will be covering ;

  • Adjust page margins
  • Header and footer
1) Adjust Page Margins

What is page margins?
- Margins are the space between the edge of the paper and the text. You can adjust the right, left, top, and bottom margins of your document.

Page Margins
How to Adjust Page Margins?

-Step 1 : Make sure you open the document. (If you want the margins to be applied only to a selected part of a document, select that particular part)

- Step 2 : Click the Page Layout tab, and click the Margins button in the Page Setup group. This will display a list of options to be selected but you have to click the Custom Margins option available at the bottom.

- Step 3 : You will have to display a Page Dialog Box as shown below where you can set top, left, right and bottom margins under the Margins Tab. Select the Apply to: option to apply the margin on selected text or complete document.


-Step 4 :  If you are going to bind the document and want to add an extra amount of space on one edge for the binding, enter that amount in the Gutter text box, and select the side the gutter is on with the Gutter Position drop-down list. Maku sure you sets all the desired values for all the margins, then click the OK button to apply the margins.

2) Header and Footer

What is Header and Footer?
- They are parts of a document that contain special information such as page numbers and the total number of pages, the document title, company logo, any photo, etc. The header appears at the top of every page, and the footer appears at the bottom of every page.

How to Add Header and Footer?

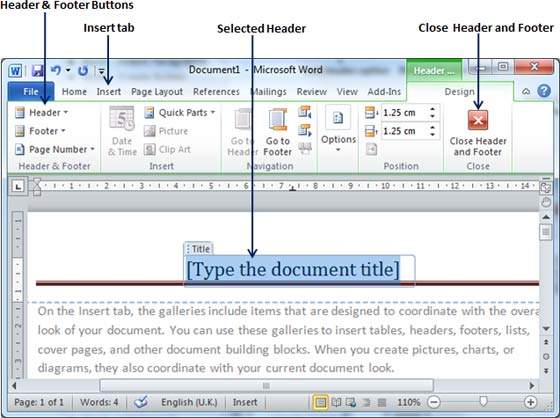
- Step 1 : Click the Insert tab, then click the Header button or the Footer button that which needs to be added first. For example, if you choose the header button, when you click on the Header Button, it will display a list of built-in Headers from where you can choose any of the headers by simply clicking on it.

- Step 2 : Once you chose any of the headers, it will be applied to the document in editable mode. The text in your document will appear dimmed, Header and Footer buttons appear on the Ribbon and a Close Header and Footer button will also appear at the top-right corner.

Selected Header

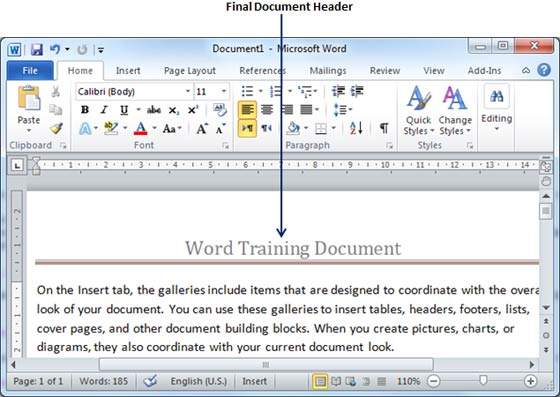
Step 3 : You can type your information whatever you want to have in your document header. Once you are done, click Close Header and Footer to come out of the header insertion mode. You will see the final result as follows.

Applied Header

* You can use the same steps for footers

Hari Interaksi Anak Johor UKM

Hello semua! Untuk post kali ini aku nak cerita serba sedikit tentang salah satu aktiviti aku di UKM. Di UKM, ada banyak persatuan yang korang boleh join. Antaranya ialah persatuan anak negeri. Aku merupakan orang johor, jadi aku memilih untuk menyertai Persatuan Mahasiswa Anak Johor UKM (PERMAJ UKM). Antara aktiviti yang telah kelab ni jalankan ialah Hari Interaksi Anak Johor yang bertempat di Hutan Pendidikan Alam, UKM. Sepanjang program 2 hari satu malam ni, banyak aktiviti dijalankan dan motif utama adalah untuk mengeratkan hubungan antara ahli-ahli baru PERMAJ. Kami dibahagikan kepada beberapa kumpulan secara rawak. Kebanyakan aktiviti dijalankan ikut kumpulan, jadi hubungan kami jadi rapat walaupun kenal tak sampai 2 hari. Seronok bila dapat kawan baru, walaupun program dah berakhir kami masih keep in touch dan berjumpa bila ada masa free.


Turn your PowerPoint slide into a video


You have two options for turning your presentation into a video that's ready to view:


1) Save/export your presentation to a video file format (.mp4 or .wmv)
  • On the File menu, select Save to ensure all your recent work has been saved in PowerPoint presentation format (.pptx).

  • Click File > Export > Create a Video. (Or, on the Recording tab of the ribbon, click Export to Video.)

  • In the first drop-down box under the Create a Video heading, select the video quality you want, which pertains to the resolution of the finished video. The higher the video quality, the larger the file size. (You may want to test them to determine which one meets your needs.)
Option
Resolution
For displaying on
Ultra HD (4K)*
3840 x 2160, largest file size
Large monitors
Full HD (1080p)
1920 x 1080, large file size
Computer and HD screens
HD (720p)
1280 x 720, medium file size
Internet and DVD
Standard (480p)
852 x 480, smallest file size
Portable devices
* The Ultra HD (4K) option is only available if you're using Windows 10.

  • The second drop-down box under the Create a Video heading tells whether your presentation includes narration and timings. (You may switch this setting if you like.)
         - If you haven't recorded timed narration, by default the value is Don't Use Recorded Timings               and Narrations.

        - The default time spent on each slide is 5 seconds. You can change that timing in the Seconds               to spend on each slide box. To the right of the box, click the up arrow to increase the duration,             or click the down arrow to decrease the duration.

        - If you have recorded a timed narration, by default the value is Use Recorded Timings and                    Narrations.
  • Click Create Video.

  •  In the File name box, enter a file name for the video, browse for the folder that will contain this file, and then click Save.

  • In the Save as type box, choose either MPEG-4 Video or Windows Media Video.
          -You can track the progress of the video creation by looking at the status bar at the bottom of               your screen. The video creation process can take up to several hours depending on the length               of the video and the complexity of the presentation.

         -Tip: For a long video, you can set it up to be created overnight. That way, it’ll be ready for you            the following morning.

  • To play your newly-created video, go to the designated folder location, and then double-click the file.


2) Save as a PowerPoint Show


  • On the File menu, select Save to ensure all your recent work has been saved in PowerPoint presentation format (.pptx).

  • On the File menu, select Save As.

  • Choose the folder location where you want to store your PowerPoint Show file.

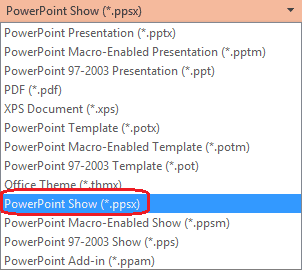
  • In the Save as type box, choose PowerPoint Show (*.ppsx).


  • Select Save.

For more understanding, you can watch this youtube tutorial :

Saturday, September 21, 2019

First day in UKM

Berdebar? excited? takut? semua perasaan aku rasa waktu pertama kali melangkah masuk ke UKM. Aku bahkan tidak dapat tidur lena pada malam sebelumnya kerana terlalu banyak perkara yang bermain difikiran. Tapi Alhamdulillah segala urusan pendaftaran berjalan dengan lancar dan aku sekarang bergelar mahasiswi di Universiti Kebangsaan Malaysia. Kenapa aku pilih UKM? Jelaslah UKM ni antara universiti yang top di Malaysia. Lokasinya pun best, takdelah ceruk hutan sangat jadi senang untuk cari transport nak ke mana-mana. Perjalanan sewaktu pendaftaran tersangatlah lancar. Trafik tak sesak, tak perlu beratur lama-lama pun waktu mendaftar. Sampai sahaja di kolej, aku diarahkan untuk membawa surat tawaran dan ambil kunci bilik dannnn SELESAI! Aku ditempatkan di Kolej Aminuddin Baki, kolej yang sangat berhampiran dengan fakulti aku iaitu Fakulti Ekonomi dan Pengurusan jadi tak perlu lah aku naik bas ke sana. Kolej Aminuddin Baki ni juga berhampiran je dengan Perpustakaan Tun Sri Lanang.


Ini adalah keadaan bilik sewaktu aku masuk. Satu bilik dua orang tapi berbeza ikutlah korang dapat yang mana. Ada bilik untuk seorang dan ada yang dapat duduk rumah. Kadar bayaran pun berbeza ikut bilik yang korang dapat. 

Pengalaman Kerja

Pengalaman kerja? Aku hanya berpengalaman bekerja di dua tempat. Pertama, sewaktu aku menunggu keputusan SPM. Pertama kali bekerja, aku mem...