Labels

Sunday, November 24, 2019

Basic skills (Formatting Pages) in Microsoft Words

Hello everyone, today i would like to share some basic knowledge about Microsoft Words. Here are some topics that I will be covering ;

  • Adjust page margins
  • Header and footer
1) Adjust Page Margins

What is page margins?
- Margins are the space between the edge of the paper and the text. You can adjust the right, left, top, and bottom margins of your document.

Page Margins
How to Adjust Page Margins?

-Step 1 : Make sure you open the document. (If you want the margins to be applied only to a selected part of a document, select that particular part)

- Step 2 : Click the Page Layout tab, and click the Margins button in the Page Setup group. This will display a list of options to be selected but you have to click the Custom Margins option available at the bottom.

- Step 3 : You will have to display a Page Dialog Box as shown below where you can set top, left, right and bottom margins under the Margins Tab. Select the Apply to: option to apply the margin on selected text or complete document.


-Step 4 :  If you are going to bind the document and want to add an extra amount of space on one edge for the binding, enter that amount in the Gutter text box, and select the side the gutter is on with the Gutter Position drop-down list. Maku sure you sets all the desired values for all the margins, then click the OK button to apply the margins.

2) Header and Footer

What is Header and Footer?
- They are parts of a document that contain special information such as page numbers and the total number of pages, the document title, company logo, any photo, etc. The header appears at the top of every page, and the footer appears at the bottom of every page.

How to Add Header and Footer?

- Step 1 : Click the Insert tab, then click the Header button or the Footer button that which needs to be added first. For example, if you choose the header button, when you click on the Header Button, it will display a list of built-in Headers from where you can choose any of the headers by simply clicking on it.

- Step 2 : Once you chose any of the headers, it will be applied to the document in editable mode. The text in your document will appear dimmed, Header and Footer buttons appear on the Ribbon and a Close Header and Footer button will also appear at the top-right corner.
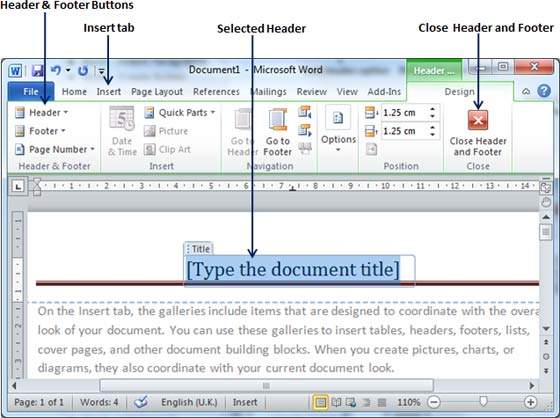
Selected Header

Step 3 : You can type your information whatever you want to have in your document header. Once you are done, click Close Header and Footer to come out of the header insertion mode. You will see the final result as follows.
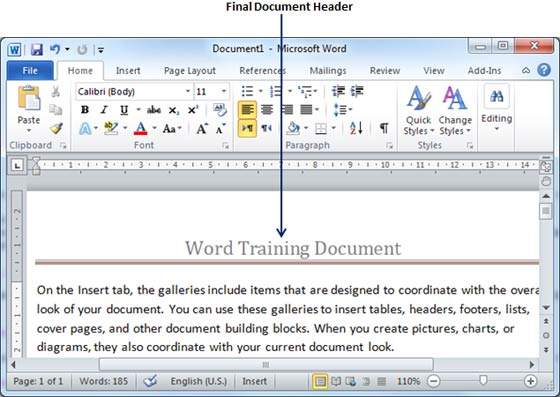
Applied Header

* You can use the same steps for footers

Hari Interaksi Anak Johor UKM

Hello semua! Untuk post kali ini aku nak cerita serba sedikit tentang salah satu aktiviti aku di UKM. Di UKM, ada banyak persatuan yang korang boleh join. Antaranya ialah persatuan anak negeri. Aku merupakan orang johor, jadi aku memilih untuk menyertai Persatuan Mahasiswa Anak Johor UKM (PERMAJ UKM). Antara aktiviti yang telah kelab ni jalankan ialah Hari Interaksi Anak Johor yang bertempat di Hutan Pendidikan Alam, UKM. Sepanjang program 2 hari satu malam ni, banyak aktiviti dijalankan dan motif utama adalah untuk mengeratkan hubungan antara ahli-ahli baru PERMAJ. Kami dibahagikan kepada beberapa kumpulan secara rawak. Kebanyakan aktiviti dijalankan ikut kumpulan, jadi hubungan kami jadi rapat walaupun kenal tak sampai 2 hari. Seronok bila dapat kawan baru, walaupun program dah berakhir kami masih keep in touch dan berjumpa bila ada masa free.


Turn your PowerPoint slide into a video


You have two options for turning your presentation into a video that's ready to view:


1) Save/export your presentation to a video file format (.mp4 or .wmv)
  • On the File menu, select Save to ensure all your recent work has been saved in PowerPoint presentation format (.pptx).

  • Click File > Export > Create a Video. (Or, on the Recording tab of the ribbon, click Export to Video.)

  • In the first drop-down box under the Create a Video heading, select the video quality you want, which pertains to the resolution of the finished video. The higher the video quality, the larger the file size. (You may want to test them to determine which one meets your needs.)
Option
Resolution
For displaying on
Ultra HD (4K)*
3840 x 2160, largest file size
Large monitors
Full HD (1080p)
1920 x 1080, large file size
Computer and HD screens
HD (720p)
1280 x 720, medium file size
Internet and DVD
Standard (480p)
852 x 480, smallest file size
Portable devices
* The Ultra HD (4K) option is only available if you're using Windows 10.

  • The second drop-down box under the Create a Video heading tells whether your presentation includes narration and timings. (You may switch this setting if you like.)
         - If you haven't recorded timed narration, by default the value is Don't Use Recorded Timings               and Narrations.

        - The default time spent on each slide is 5 seconds. You can change that timing in the Seconds               to spend on each slide box. To the right of the box, click the up arrow to increase the duration,             or click the down arrow to decrease the duration.

        - If you have recorded a timed narration, by default the value is Use Recorded Timings and                    Narrations.
  • Click Create Video.

  •  In the File name box, enter a file name for the video, browse for the folder that will contain this file, and then click Save.

  • In the Save as type box, choose either MPEG-4 Video or Windows Media Video.
          -You can track the progress of the video creation by looking at the status bar at the bottom of               your screen. The video creation process can take up to several hours depending on the length               of the video and the complexity of the presentation.

         -Tip: For a long video, you can set it up to be created overnight. That way, it’ll be ready for you            the following morning.

  • To play your newly-created video, go to the designated folder location, and then double-click the file.


2) Save as a PowerPoint Show


  • On the File menu, select Save to ensure all your recent work has been saved in PowerPoint presentation format (.pptx).

  • On the File menu, select Save As.

  • Choose the folder location where you want to store your PowerPoint Show file.

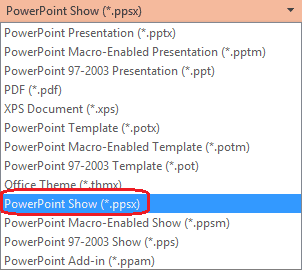
  • In the Save as type box, choose PowerPoint Show (*.ppsx).


  • Select Save.

For more understanding, you can watch this youtube tutorial :

Pengalaman Kerja

Pengalaman kerja? Aku hanya berpengalaman bekerja di dua tempat. Pertama, sewaktu aku menunggu keputusan SPM. Pertama kali bekerja, aku mem...